TL;DR:
- Many Calgary homeowners overestimate outdoor light needs, leading to glare and energy waste. A layered lighting strategy enhances safety, curb appeal, and efficiency by deliberately placing ambient, task, and accent lights. Proper planning, local regulations, and professional guidance ensure an effective, glare-free exterior illumination.
Many Calgary homeowners believe that brighter always means safer, and that the answer to a dark yard is simply adding more fixtures. But homeowners often overestimate how much light is actually needed outdoors, leading to uncomfortable glare, wasted energy, and a front yard that looks washed out rather than welcoming. A smart outdoor illumination strategy is a deliberate, layered approach that places the right light in the right spot for the right purpose. In this guide, you'll learn the core principles, local Calgary considerations, and practical steps to transform your exterior lighting from a blunt tool into a refined asset.
Table of Contents
- What is an outdoor illumination strategy?
- How to layer outdoor lighting for your home
- Local regulations and best practices in Calgary
- Common mistakes and pro tips for flawless results
- Our perspective: Why less can be more in outdoor illumination
- Get expert help with your outdoor illumination strategy
- Frequently asked questions
Key Takeaways
| Point | Details |
|---|---|
| Layer lighting for harmony | Combining ambient, task, and accent lighting creates a safer and more beautiful home exterior. |
| Follow Calgary's guidelines | Complying with local rules prevents common issues and ensures neighbour-friendly illumination. |
| Avoid over-lighting | Using too much light causes glare, wastes energy, and can actually reduce security and comfort. |
| Test and adjust | Always review lighting at night to refine aiming and brightness for flawless results. |
What is an outdoor illumination strategy?
An outdoor illumination strategy is far more than deciding how many pot lights to screw into your soffit. A planned lighting approach divides your exterior into distinct roles, ambient, task, and accent, and then aligns fixture types, placement, and controls to serve safety, aesthetics, and energy efficiency simultaneously. Think of it as interior design logic applied outside your front door.

Ambient lighting provides the general wash of visibility across your property. It keeps your driveway and yard readable without creating deep shadows or contrast-heavy blind spots. Task lighting is purely functional: it illuminates paths, stairs, garage entries, and doorways so people move safely without tripping or stumbling. Accent lighting, meanwhile, highlights your home's architectural features, mature trees, garden beds, or front porch columns to create depth and visual interest after dark.
The three core goals of any solid strategy are safety and visibility, curb appeal and aesthetics, and long-term energy efficiency. These aren't competing priorities. When you layer them correctly, each goal supports the others. A well-aimed accent light on your home's stonework, for example, simultaneously improves visibility and elevates your kerb presence.
For Calgary homeowners specifically, this planning matters even more. Harsh winters, heavy snowfall, and wide temperature swings mean that fixtures installed without proper planning often fail prematurely or create glare amplified by reflective snow. Understanding residential outdoor lighting basics before buying a single fixture will save you time, money, and frustration.
How each lighting layer contributes
| Lighting layer | Primary goal | Calgary benefit |
|---|---|---|
| Ambient | General visibility | Reduces shadowed areas in winter darkness |
| Task | Safety and function | Keeps icy paths and steps safe |
| Accent | Aesthetics and appeal | Boosts kerb appeal year-round |
Each layer operates best when it's intentional. Ambient light positioned too high or too bright overwhelms task and accent layers, making your entire exterior feel like a parking lot rather than a home.
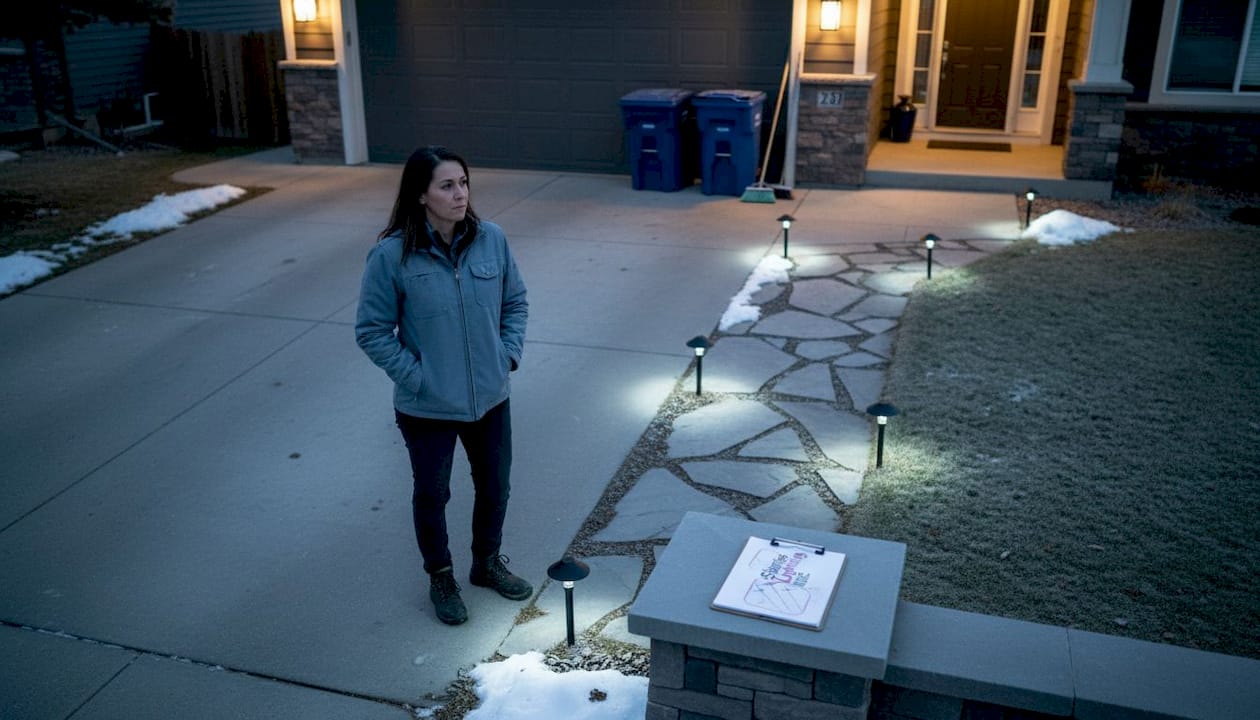
How to layer outdoor lighting for your home
With the basics defined, the next step is turning those concepts into a practical plan for your Calgary property. Layering is not complicated, but it does require a bit of upfront thinking before you start drilling holes or running wire.
Step 1: Assess your needs. Walk your property after dark and note every area that feels unsafe, unwelcoming, or poorly visible. Jot down where you trip, where visitors hesitate, and where your home's best features disappear into shadow.
Step 2: Map your zones. Divide the property into functional areas: the front approach and driveway, the entry and porch, the side passages, the backyard, and any landscaping you want to feature. Each zone will need a different mix of the three lighting layers.
Step 3: Choose fixtures for each layer. Ambient, task, and accent fixtures serve distinct purposes, so match them carefully. For ambient, consider broad-wash floodlights mounted high and aimed downward. For task, low-profile path lights and stair risers work well. For accent, directional spotlights or up-lights positioned at the base of a feature wall or tree create the drama you're after.
Step 4: Test before you commit. Use temporary clamp lights or battery-powered fixtures to simulate your plan at night before any permanent installation. This is the single best move most homeowners skip entirely.
Step 5: Refine and finalise. Adjust angles, swap bulb strengths, and reposition anything that creates glare or unwanted spill into neighbouring properties. Only then should permanent fixtures go in.
For a detailed walkthrough matched to local conditions, the lighting checklist for Calgary homes is a solid starting point that covers each zone methodically.
The benefits of layering go beyond looks. Combining modest ambient with targeted task lighting actually improves perceived security more effectively than flooding the yard with a single blazing source. Criminals avoid well-lit perimeters, but they also avoid properties where shadows are eliminated strategically rather than brute-forced with raw brightness. You use less energy, create less glare, and get a more secure result.
You'll also find that layered lighting dramatically improves curb appeal during the long Calgary winter evenings. Explore lighting ideas for Calgary homes to see how real properties transform with thoughtful layering.
Pro Tip: Add dimmers, directional shields, and programmable timers to every zone from the start. These controls let you shift from a bright, welcoming entry setting for evening guests to a low-level security mode after midnight, all without touching a single fixture manually.
Local regulations and best practices in Calgary
Proper layering is only part of the strategy. Success also depends on working within Calgary's municipal standards and sidestepping the common pitfalls that lead to complaints, costly corrections, and bylaw notices.
City of Calgary street-light design guidelines supplement residential exterior lighting design, providing reference points for acceptable lumen output, shielding requirements, and light trespass standards. These guidelines exist for good reason: poorly aimed exterior lights can reduce road safety by creating glare for drivers, disturb neighbours who are trying to sleep, and wash out the night sky unnecessarily.
Over-lighting and glare are the two most common triggers for neighbour complaints and bylaw involvement. When a fixture is aimed outward instead of downward, the light escapes your property line and becomes someone else's problem. This is called light trespass, and it's avoidable with the right shielding or a simple adjustment to fixture aim.
Reviewing lighting compliance for Calgary homeowners before you install anything new is a sensible precaution that many homeowners skip until it's too late.
Common mistakes and how to fix them
| Mistake | What it causes | Quick fix |
|---|---|---|
| Fixtures aimed outward | Light trespass and glare | Redirect downward and add shields |
| Excess lumen output | Washed-out appearance, complaints | Switch to lower-output LED fixtures |
| No shielding on bright sources | Disability glare for drivers | Install full-cutoff shields |
| Timers not set correctly | Lights on all night unnecessarily | Programme timers or add motion sensors |
| Ignoring snow reflectance | Unexpected brightness in winter | Reduce lumen output by 20 to 30 percent |
Before upgrading or adding any exterior lights, run through this quick checklist:
- Confirm fixture aim is directed downward, not outward
- Check that lumen output suits the zone (paths need far fewer lumens than a driveway)
- Verify shielding is in place on any bright source near the property line
- Review the City of Calgary's published guidelines for your property type
- Test the full system at night and walk your neighbour's perspective from the street
Staying ahead of compliance issues also means less maintenance headache later. Good installation habits reduce the frequency of adjustments, and you'll find useful maintenance tips for exterior lighting that keep your system performing season after season.
Common mistakes and pro tips for flawless results
Knowing the rules is just the start. Here is where you elevate your project by avoiding the errors that trip up even well-intentioned homeowners.
The top four mistakes are predictable but persistent:
- Excess lumens. Choosing bulbs based on wattage habit rather than actual lumen need. A 400-lumen path light is often sufficient where homeowners install 1,000-lumen floods.
- Poor light aiming. Installing fixtures without adjusting their angle. Most come from the box aimed in a direction that suits no actual property layout.
- Ignoring shielding. Bare bulbs or wide-beam lenses produce glare that makes your exterior harder to read, not easier.
- Neglecting controls. Installing lights without timers, dimmers, or sensors is like buying a car without a steering wheel. You lose nearly all the precision that makes layered lighting effective.
"The most common error is assuming more brightness equals more safety or curb appeal. In reality, targeted, modest lighting outperforms raw wattage every time. The homes that look best at night are never the brightest ones on the block."
This echoes what multiple sources warn: homeowners consistently overestimate lumen needs, ending up with glare that paradoxically reduces visibility in the areas that matter most.
Here is a numbered checklist to keep your project on track:
- Map every lighting zone before purchasing a single fixture
- Choose fixtures based on the lumen requirement of that specific zone
- Aim every fixture downward before switching it on for the first time
- Add a shield or hood to any source within 3 metres of a property line
- Connect all fixtures to timers or smart controls at installation
- Test the entire system at night and walk the full perimeter
- Adjust any fixture that creates visible glare from the street or neighbour's yard
- Repeat the night test after the first heavy snowfall
If security is your primary driver, detailed security lighting tips cover the specific zones and lumen ranges that research links to meaningful deterrence.
When you're ready to update older fixtures entirely, upgrading exterior lighting in Calgary covers the full process from planning through installation.
Pro Tip: Always conduct your final test at night, ideally on a clear evening when you can see the full effect. Walk to the street, look from each neighbour's perspective, and check from an upstairs window if possible. You'll catch aiming errors and glare sources that are invisible during the day.
Our perspective: Why less can be more in outdoor illumination
After working with Calgary homeowners on dozens of exterior lighting projects, one pattern stands out clearly: the properties that impress the most are almost never the brightest ones. The homes that earn compliments from neighbours and add genuine value at sale are the ones where every fixture has a reason to be exactly where it is.
Most homeowners arrive at a lighting project believing they need to solve a darkness problem with more light. What they actually have is a placement problem, a control problem, or an aim problem. Adding more fixtures before solving those underlying issues just amplifies the original mistake.
We've seen 3,000-square-foot homes lit beautifully with eight well-placed fixtures, and we've seen the same footprint ruined by twenty poorly aimed ones. The difference is always design intentionality, not fixture count.
The approach that works is to start simple. Install your ambient layer, live with it for two weeks, and assess honestly. Then add task lighting for the zones where you actually feel the need. Accent lighting comes last, applied only to the features genuinely worth highlighting. This progressive method prevents over-investment and over-lighting simultaneously.
There's a saying we come back to often when homeowners want to keep adding more: you don't need a stadium. You need the right light, in the right spot, with the right control. That philosophy, applied consistently, is what separates an exterior that feels polished from one that just feels bright.
Choosing fixtures and styles that suit your home's architecture is where this all comes together. Exploring how to choose outdoor lighting for Calgary homes will help you match the design language of your lighting to your property's character, so the result looks intentional rather than assembled.
Get expert help with your outdoor illumination strategy
Once you understand the principles, working with Calgary lighting professionals makes the execution far smoother and the results more reliable.

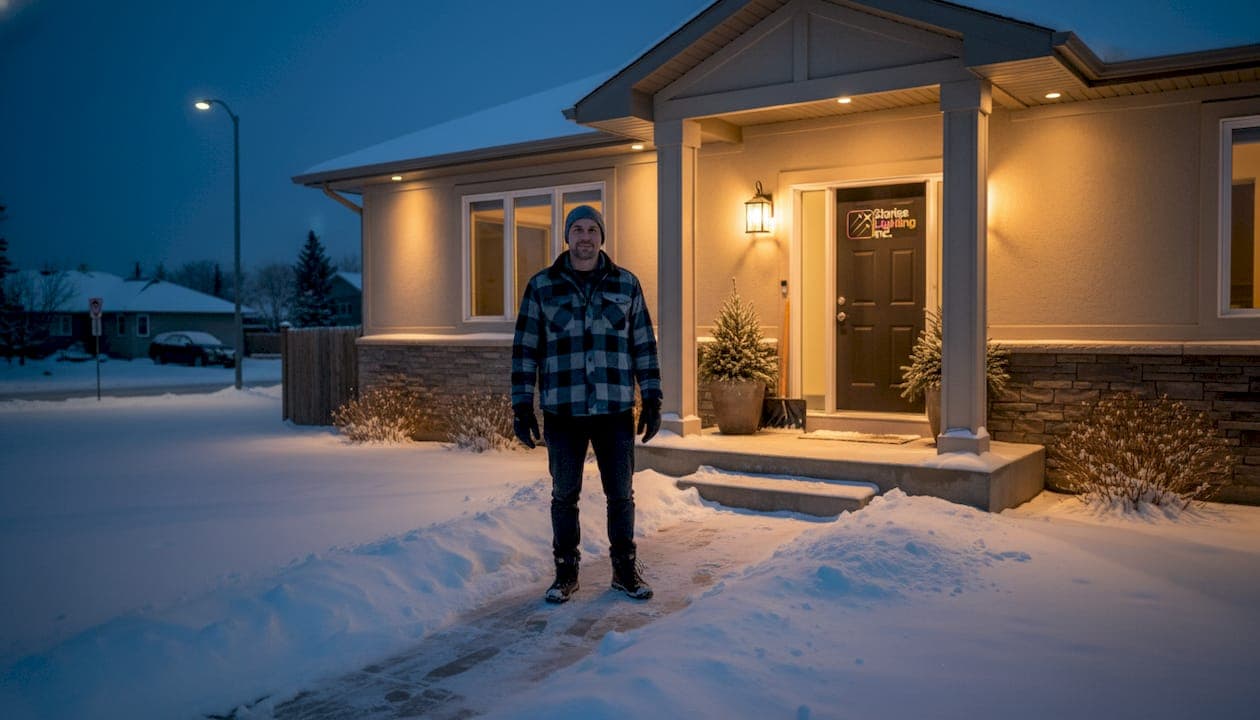
At Starise Lighting, we specialise in permanent outdoor lighting systems built specifically for Calgary's climate, from our Gen 2 24V LED technology to weatherproof fixtures rated for the extremes of prairie winters. Our systems are installed once, controlled via a simple app, and designed to deliver layered, code-compliant illumination night after night without ongoing maintenance headaches. Whether you're starting from scratch or replacing an underperforming setup, browse permanent lights in Calgary to see what a fully designed system looks like. You can also explore the full Starise Lighting system to understand the technology behind every installation. Request a free consultation and bring your outdoor illumination vision to life with expert guidance from a team that knows Calgary properties inside and out.
Frequently asked questions
What are the core layers in an outdoor illumination strategy?
The three main layers are ambient lighting for general visibility, task lighting for safety and function, and accent lighting for aesthetics and architectural interest.
Why avoid too much outdoor lighting in Calgary?
Excessive outdoor lighting causes glare, reduces visual comfort, wastes energy, and can lead to neighbour complaints or bylaw issues, particularly when snow amplifies brightness in winter.
Do I need to follow city regulations for outdoor lighting?
Yes. Calgary's street-light design guidelines apply to residential exterior lighting and cover lumen limits, shielding requirements, and light trespass standards that protect both safety and neighbourly relations.
What is one quick tip for better outdoor lighting results?
Test your finished lighting system at night, walk your full property perimeter, and adjust fixture aiming and dimmer settings before finalising any permanent installation.