TL;DR:
- Effective outdoor lighting requires layering ambient, task, and accent illumination to ensure safety, usability, and visual appeal. Precise fixture placement, correct fixture aiming, and choosing appropriate colour temperatures are essential for achieving a professional, glare-free result. Modern tools like AI visualization enable homeowners to preview designs before installation, preventing common mistakes and ensuring satisfying outcomes.
A purposeful outdoor lighting design is defined by three coordinated layers: ambient, task, and accent lighting, each serving a distinct role in making your property safe, usable, and visually compelling. This lighting design inspirations list organises ideas by function and technique rather than fixture style alone, so every choice you make has a clear purpose. Whether you are planning a full exterior overhaul or adding a few well-placed fixtures, the principles here apply to any home. References like Portfolio Lighting and GenRoom offer excellent planning tools, and Co-starise brings these concepts to life with permanent LED systems built for Canadian winters.
How to layer outdoor lighting for maximum effect
Outdoor lighting works best when structured around three distinct layers: ambient, task, and accent. Professionals call this layered illumination, and it is the foundation of every strong exterior lighting plan. Skipping any one layer produces a yard that either feels flat, unsafe, or visually chaotic.
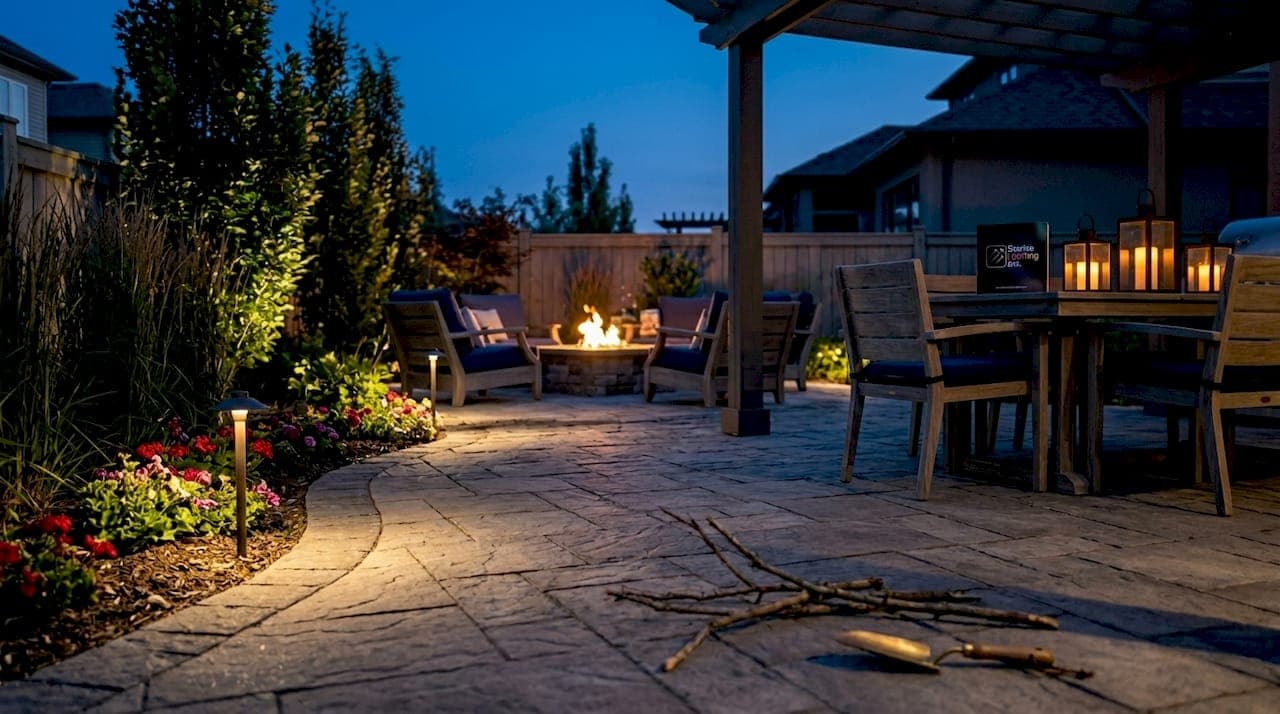
Ambient lighting provides the overall glow that makes a space feel inhabited and welcoming. Think patio lanterns, post cap lights, or soft overhead fixtures that wash a broad area in gentle light. This layer sets the mood before any other fixture does its job.
Task lighting is purely functional. It guides people safely along walkways, up steps, and along driveway edges. Path lights, step lights, and bollard fixtures all belong here. Without this layer, even a beautifully lit yard becomes a tripping hazard after dark.
Accent lighting is where personality enters the design. Uplighting a mature tree, grazing a stone wall, or highlighting an architectural detail all fall into this category. Accent fixtures draw the eye to focal points and give a yard genuine depth.
Pro Tip: Begin every lighting plan with a night-safety audit. Walk your property after dark and mark every walkway, step, and driveway edge before placing a single accent fixture. Functional placement first prevents the most common homeowner mistake: decorating before illuminating.
1. Uplighting
Uplighting places a fixture at ground level and aims it upward at a tree, column, or architectural feature. The result is dramatic and sculptural, pulling the eye toward height and structure. It works particularly well on mature trees with interesting branch patterns, stone chimneys, and garage facades.
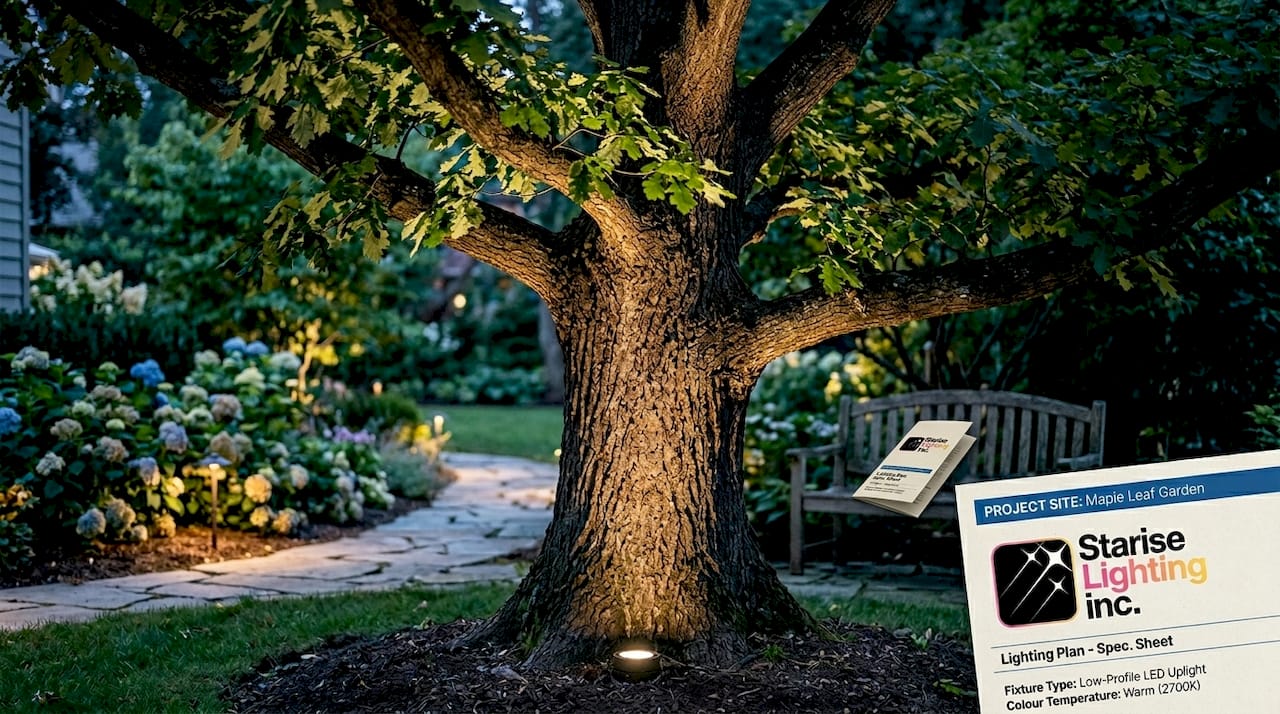
The key to good uplighting is precise aiming. A fixture pointed too steeply creates a harsh, theatrical look. Angled at roughly 30 to 45 degrees from vertical, the light wraps naturally around the subject and softens the effect considerably.
2. Downlighting
Downlighting mimics natural moonlight by mounting fixtures high in trees or on eaves and directing light downward. The dappled shadows it casts on patios and lawns are among the most sought-after effects in residential exterior design. It also doubles as functional ambient lighting for entertaining areas.
This technique suits large canopy trees and tall pergola structures especially well. Because the source is hidden high above, the effect reads as atmospheric rather than artificial.
3. Path lighting
Path lights are the workhorses of any creative lighting ideas list. Spacing path lights six to ten feet apart produces even wayfinding illumination without patchy gaps. On curved paths, tighter spacing prevents dark zones on the inside of bends.
Bollard fixtures and low mushroom-cap path lights both work well here. Choose fixtures with shielded optics so light falls downward onto the path rather than glaring outward at eye level.
4. Silhouetting
Silhouetting places a light source behind a plant or object, between the subject and the viewer. The result is a bold, graphic outline with no surface detail visible. Ornamental grasses, sculptural shrubs, and garden art all produce striking silhouettes against a lit wall or fence.
This technique is deliberately simple and high contrast. It works best when the silhouetted subject has a strong, recognisable shape. Overusing it dilutes the impact, so reserve it for one or two focal points per yard.
5. Shadowing
Shadowing is the inverse of silhouetting. A fixture placed in front of and below a subject projects its shadow onto a wall or fence behind it. The shadow is often larger than the plant itself, creating a theatrical, oversized effect that changes with wind movement.
Ornamental grasses and bamboo are particularly effective subjects. The moving shadows they cast on a rendered wall add a layer of animation that no static fixture can replicate.
6. Grazing
Grazing positions a fixture very close to a textured surface and aims it nearly parallel to that surface. The raking light reveals every bump, groove, and irregularity in stone, brick, or timber cladding. It is one of the most effective ways to add visual richness to an otherwise flat exterior wall.
The fixture must be placed within 15 to 30 centimetres of the surface for the effect to read clearly. Any further away and the light washes the surface rather than grazing it.
7. Washing
Washing floods a broad surface with even, diffuse light. Unlike grazing, it smooths out texture rather than emphasising it. It suits rendered walls, hedges, and garden fences where a clean, uniform glow is the goal rather than dramatic texture play.
Wide-beam floodlights and linear ground fixtures both deliver a good wash. This technique pairs well with uplighting on adjacent trees to create a layered backdrop for a garden bed or entertaining area.
8. Smart lighting and automation
Smart lighting with automation and scheduling increases convenience and energy efficiency while enabling precise mood control. Sunset-to-sunrise timers, motion triggers, and app-based dimming all reduce energy waste without sacrificing safety. Co-starise's Gen 2 24V LED system pairs with a dedicated app that lets you adjust colour, brightness, and effects from your phone.
Automation also improves security. Lights that respond to motion at entry points and driveway edges deter opportunistic intrusion far more effectively than lights left on a fixed schedule. For a full walkthrough of app-based control, the outdoor lighting control guide from Co-starise covers setup step by step.
9. String lights and festoon lighting
String lights have moved well beyond seasonal decoration. Hung across a pergola, between fence posts, or draped through a tree canopy, they create a warm, social atmosphere that suits outdoor dining and entertaining spaces. The best modern string lights use LED filament bulbs that replicate the warm glow of incandescent without the energy draw.
Festoon lighting works at a slightly larger scale, with larger globe bulbs spaced further apart. It suits commercial-style outdoor kitchens and large patio areas where a bolder visual statement is appropriate.
10. Recessed deck and step lighting
Recessed fixtures set flush into deck boards or stair risers provide task lighting that is completely invisible during the day. They are among the cleanest solutions in any modern lighting design styles catalogue because they add function without adding visual clutter to the architecture.
Warm white recessed step lights at 2700K to 3000K integrate naturally with timber decking and stone paving. They are particularly valuable in Calgary, where icy steps after dark are a genuine safety concern through much of the year.
Fixture placement and spacing for glare-free results
Getting fixture placement right is an optics problem as much as an aesthetic one. Full cut-off fixtures emit no light above the 90-degree horizontal plane from the fixture base, which prevents glare from spilling across property lines and into neighbours' windows. Many municipalities require them, and they simply produce better-looking results regardless of local codes.
| Placement scenario | Recommended approach |
|---|---|
| Straight walkway | Space path lights 8 to 10 feet apart with shielded downward optics |
| Curved path | Reduce spacing to 6 feet on inside of curves to prevent dark zones |
| Driveway edge | Use bollards or recessed ground fixtures every 8 feet for consistent edge definition |
| Accent uplighting | Aim fixture at 30 to 45 degrees from vertical; keep beam tight to subject |
| Patio ambient | Mount overhead fixtures at eave height; use wide-beam diffused optics |
Low-voltage landscape systems are the standard choice for residential use. They are safer to work around, easier to expand over time, and compatible with modern smart transformers that allow zone-by-zone dimming. Size your transformer to 125 percent of your total fixture wattage load to allow for future additions without rewiring.
Pro Tip: Treat glare as an optics problem, not a brightness problem. Reducing bulb wattage while keeping a poorly aimed fixture still produces glare. Precise fixture aiming and full cut-off optics solve the problem at the source.
Colour temperature and light intensity for outdoor spaces
Colour temperature is measured in Kelvin and has a direct effect on how your yard feels after dark. The right choice depends on the mood you want and the natural materials you are working with.
- 2700K to 3000K (warm white): Suits timber decking, warm stone, and entertaining areas. Creates a relaxed, residential atmosphere that reads as inviting rather than institutional.
- 3500K to 4000K (neutral white): Works well for driveways, garage facades, and security-focused areas. Provides good colour rendering without the harshness of cool white.
- 4200K (soft daylight): A comfortable compromise for faux sunlight effects that avoids the sterile quality of true daylight at 5200K. Useful where outdoor and indoor lighting must read cohesively through glazing.
- 5200K and above (cool daylight): Best reserved for commercial or security applications. In residential settings, it tends to make gardens feel clinical and unwelcoming.
Dimmable and warm-dimming LED fixtures give you the most flexibility. Warm-dimming LEDs shift toward a warmer colour temperature as they dim, mimicking the behaviour of incandescent bulbs and producing a genuinely comfortable evening atmosphere.
Innovative tools shaping modern lighting design inspiration
AI-powered tools like GenRoom allow homeowners to upload a photo of their yard and preview different lighting styles and fixture placements virtually before committing to installation. This removes most of the guesswork from building a lighting design inspirations list and makes it far easier to compare techniques side by side.
Beyond visualisation, modern exterior lighting trends worth noting include:
- Integrated landscape fixtures that sit flush with paving, decking, and garden walls for a clean, architectural finish
- Warm-dimming LED technology that adjusts colour temperature with brightness for natural-feeling evening light
- App-controlled zoning that lets you run different lighting scenes for entertaining, security, and sleep modes from a single interface
- Solar-assisted low-voltage systems that reduce grid draw on long summer evenings
For homeowners in Calgary, smart security lighting that integrates motion detection with scheduled ambient lighting provides both curb appeal and genuine deterrence through the long winter nights.
Key takeaways
A well-executed outdoor lighting plan layers ambient, task, and accent techniques with precise fixture placement, correct colour temperature, and full cut-off optics to produce results that are both beautiful and compliant.
| Point | Details |
|---|---|
| Layer before decorating | Map ambient, task, and accent zones before selecting any fixture style. |
| Space path lights correctly | Six to ten feet apart on straight runs; tighter on curves to prevent dark zones. |
| Use full cut-off fixtures | Shields optics prevent glare and light trespass across property lines. |
| Choose colour temperature deliberately | Warm white (2700K to 3000K) suits most residential spaces; avoid cool daylight above 4200K. |
| Preview with AI tools | GenRoom and similar platforms let you compare techniques before installation. |
What I have learned building outdoor lighting plans that actually work
Most homeowners come to outdoor lighting with a list of fixtures they like the look of. That is the wrong starting point. The yards that genuinely impress after dark are the ones where someone mapped the safety requirements first, then built the aesthetic layer on top of that foundation. Beauty follows function in outdoor lighting, not the other way around.
The other mistake I see constantly is treating glare as a brightness issue. Homeowners dim their fixtures and still end up with uncomfortable, spilly light because the fixture itself is aimed poorly or has no cut-off optics. Optics engineering matters more than wattage. A 5-watt fixture aimed correctly outperforms a 15-watt fixture aimed carelessly every single time.
The techniques in this list, particularly shadowing, grazing, and silhouetting, are underused in residential design because they require more precise placement than simply staking a path light into the ground. But they are exactly what separates a yard that looks professionally designed from one that just has lights in it. If you are going to invest in permanent fixtures, invest the extra hour in placement.
Finally, preview tools like GenRoom have genuinely changed how accessible good lighting design is for homeowners. There is no reason to guess anymore. Upload a photo, try five different techniques, and make an informed decision before a single fixture goes in the ground. That one step alone prevents most of the regret I hear about from homeowners who installed first and planned second.
— Starise
Bring your lighting inspirations to life with Co-starise
Ready to move from inspiration to installation? Co-starise designs and installs permanent outdoor lighting systems built specifically for residential properties in Calgary and surrounding areas. Every system uses Gen 2 24V LED technology with weatherproof construction rated for harsh Canadian winters, app-based control for scenes and scheduling, and professional-grade fixture placement that puts the techniques in this article to work on your actual property.

Whether you want warm ambient lighting for a backyard patio, precise path lighting along a curved driveway, or a full layered design that covers every technique from uplighting to smart automation, Co-starise delivers a complete lighting system installed once and enjoyed every night. Request a quote and see what your home looks like after dark.
FAQ
What are the three layers of outdoor lighting design?
The three layers are ambient, task, and accent lighting. Ambient provides overall illumination, task lighting guides safe movement along paths and steps, and accent lighting highlights focal features like trees and architecture.
How far apart should path lights be spaced?
Path lights should be spaced six to ten feet apart on straight runs for even illumination. On curved paths, reduce spacing to six feet on the inside of curves to prevent dark zones.
What colour temperature is best for residential outdoor lighting?
Warm white at 2700K to 3000K suits most residential outdoor spaces, creating an inviting atmosphere that complements timber and stone. Avoid cool daylight temperatures above 4200K in garden and entertaining areas.
What are full cut-off fixtures and why do they matter?
Full cut-off fixtures emit no light above the 90-degree horizontal plane from the fixture base. They prevent glare and light trespass onto neighbouring properties and are required by many municipal codes.
Can I preview outdoor lighting designs before installation?
Yes. AI-powered tools like GenRoom allow homeowners to upload yard photos and render different lighting styles and placements virtually, making it straightforward to compare techniques before committing to installation.