TL;DR:
- Installing LED lighting properly involves thorough planning, safety precautions, and smart control integration to maximize energy savings. Proper tools, materials, and understanding room-specific lighting needs prevent costly mistakes and ensure effective fixture placement. Smart controls like occupancy sensors and programmable dimmers further enhance efficiency, delivering substantial long-term benefits.
LED lighting is the most cost-effective upgrade a homeowner can make to reduce electricity bills, and following the right energy efficient lighting installation steps determines whether that upgrade delivers on its promise. LEDs consume 75–80% less energy than incandescent bulbs and last over 50,000 hours. That lifespan means fewer replacements, lower maintenance costs, and a noticeably better quality of light throughout your home. Done correctly, the process combines safe wiring practices, smart fixture placement, and optional automation controls that push savings even further. This guide walks you through every stage, from gathering tools to testing your final setup.
What tools and materials are required for energy-efficient lighting installation?
Arriving at a job without the right tools is the fastest way to turn a 30-minute swap into a half-day ordeal. Before you touch a single fixture, stock your workspace with the following.
Essential tools:
- Voltage tester or non-contact tester (confirms power is off before you touch any wiring)
- Wire strippers and lineman's pliers
- Flathead and Phillips screwdrivers in multiple sizes
- A sturdy ladder rated for your ceiling height
- Multimeter for checking circuit continuity and load
- Stud finder or laser measuring tool for ceiling mapping
Materials:
- LED bulbs or integrated LED fixtures matched to your existing socket types
- Wiring in the correct gauge (14 AWG for 15-amp circuits, 12 AWG for 20-amp circuits)
- Junction boxes rated for the fixture weight
- Wire nuts and electrical tape
Safety equipment:
- Insulated gloves
- Safety glasses
- Dust mask when cutting into drywall or older ceilings
Pro Tip: Buy a voltage tester that has both audible and visual alerts. In a noisy room or bright daylight, a single-mode tester is easy to misread, and a misread can send you into a live circuit.
| Fixture type | Typical socket | Compatibility note |
|---|---|---|
| Recessed downlight | GU10 or E26 | Confirm trim ring diameter before ordering |
| Track lighting | GU10 or MR16 | Check driver voltage (12V vs. 120V) |
| Pendant or chandelier | E26 or E12 | Verify junction box weight rating |
| Under-cabinet strip | Hardwired or plug-in | Confirm dimmer driver compatibility |
Getting the right materials upfront prevents mid-project trips to the hardware store and keeps your installation on schedule.
How to plan and assess your home lighting needs before installation
Lighting installation failures mostly come from poor pre-planning and ignoring room-specific lighting needs. A kitchen needs bright, shadow-free task lighting over counters. A bedroom calls for warm, dimmable ambient light. A hallway benefits from low-wattage accent fixtures that stay on overnight without running up your bill. Matching fixture type and placement to room function is the foundation of a good energy efficient lighting setup guide.

Start by sketching a rough floor plan of each room you plan to upgrade. Mark the ceiling height, note where joists and ducts run, and identify any insulation that could block a recessed can. Mapping ceiling obstacles with a laser measuring tool and your home's blueprints prevents costly drywall repairs caused by poor fixture placement.
Layer ambient, task, and accent lighting for the best results in every room. Ambient light fills the space, task light targets work surfaces, and accent light highlights architectural features or artwork. This three-layer approach reduces glare, cuts the number of fixtures you need, and gives you far more control over the mood of a room. You can explore a curated set of lighting design ideas to see how layering works in real Calgary homes.
For recessed lights specifically, space fixtures 4 to 6 feet apart and keep them at least 2 feet from walls to avoid scalloping (uneven patches of light on the wall surface). Before finalising your plan, confirm that your chosen fixtures and dimmers are compatible. Dimmer mismatches are the leading cause of LED flicker, and catching the issue on paper costs nothing.
Pro Tip: Photograph your ceiling plan and save it alongside your fixture receipts. When a bulb fails two years from now, you will know exactly which model to reorder without pulling apart the ceiling.
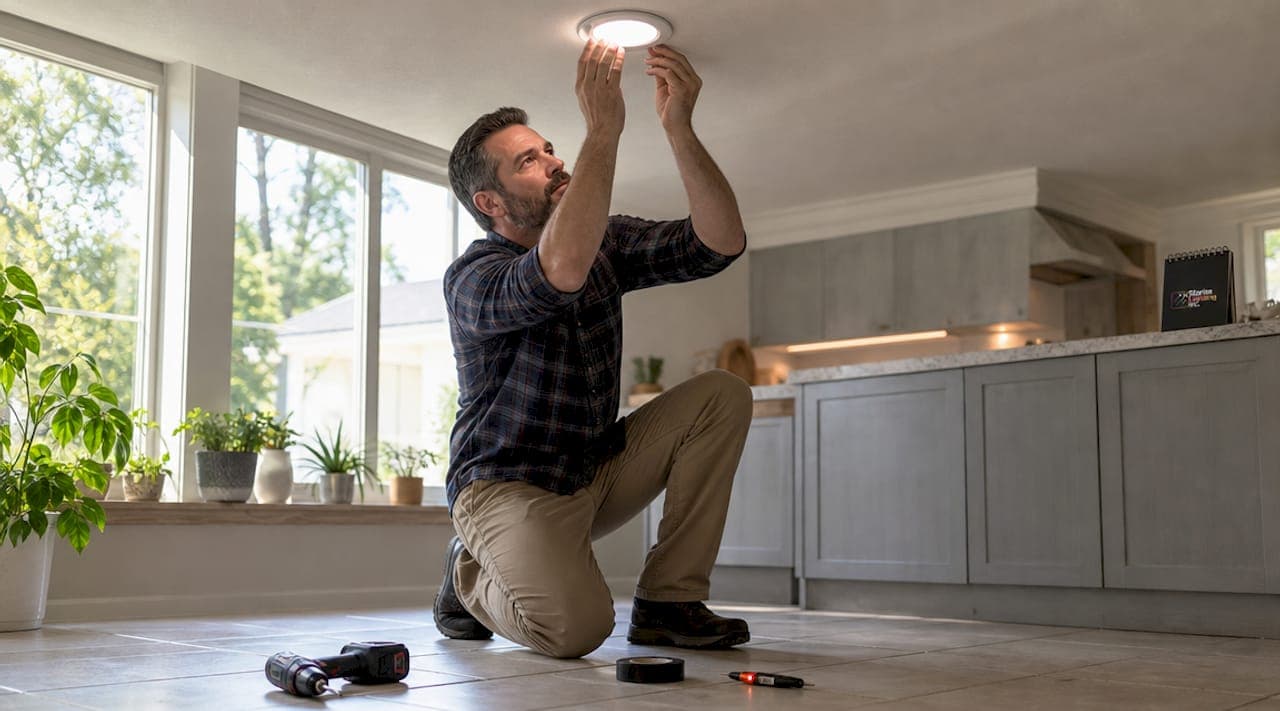
What are the step-by-step installation procedures for energy-efficient lighting?
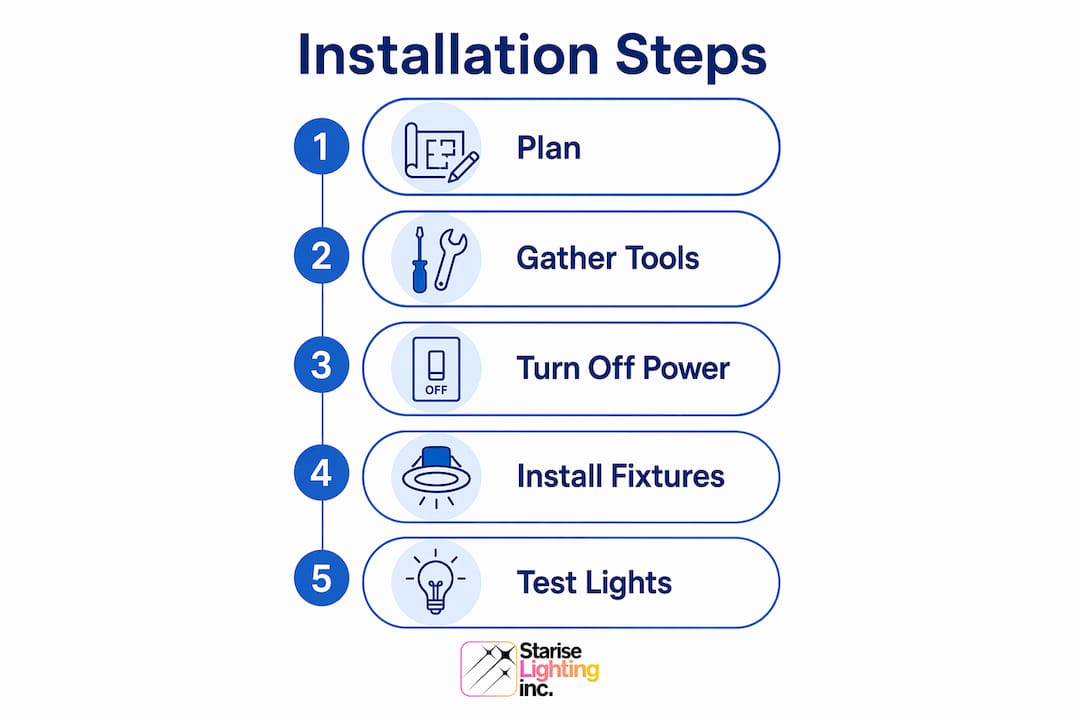
This is the core of any energy efficient bulb installation guide. Follow these steps in order and do not skip the safety checks.
-
Shut off power at the breaker. Locate the correct circuit on your panel and switch it off. Use a voltage tester to confirm the circuit is dead at the fixture location before touching any wiring. This step is non-negotiable.
-
Mark and cut fixture locations. Use your ceiling plan to mark each fixture position with a pencil. Drill a small pilot hole first and probe for joists, ducts, or insulation before cutting the full opening. A recessed light housing that lands on a joist means patching drywall and starting over.
-
Run wiring to each fixture location. Feed cable from the power source to each fixture box, following your local electrical code for stapling intervals and protection at penetrations. In finished ceilings, a fish tape or flexible drill bit makes this significantly easier.
-
Connect wiring inside junction boxes. Match wire colours precisely: black to black (hot), white to white (neutral), and bare copper or green to ground. Twist connections clockwise and secure with wire nuts, then wrap with electrical tape. Secure wiring in junction boxes is a code requirement, not just a best practice.
-
Mount fixtures and install trims. Clip or screw the housing into the ceiling opening, then snap or thread the trim ring into place. For pendant or track fixtures, attach the canopy to the junction box and tighten the mounting screws until the fixture sits flush.
-
Re-energise the circuit and test. Restore power at the breaker and switch on each fixture. Check for full brightness, confirm dimmer response if applicable, and look for any flickering that signals a compatibility issue.
Safety note: Never work on a live circuit. Even a brief contact with a 120V line can cause cardiac arrest. Always verify with a tester, not just by flipping the breaker.
| Fixture type | Installation complexity | Average time per fixture |
|---|---|---|
| Simple bulb swap | Low | 5 to 10 minutes |
| Recessed downlight (new) | Medium | 45 to 90 minutes |
| Track lighting system | Medium | 60 to 120 minutes |
| Hardwired pendant | High | 90 to 150 minutes |
Recessed lighting installation averages $422 to $598 per project when professionally done, with simple swaps taking as little as 30 minutes. Knowing that range helps you decide which tasks to DIY and which to hand off.
How can smart controls optimise your energy-efficient lighting setup?
Installing LED fixtures is only the first layer of savings. Automated lighting schedules and motion sensors reduce lighting energy bills by an additional 30 to 50% beyond the LED conversion alone. That is a meaningful number on a Calgary electricity bill, especially through the long winter months when lights run for 14 or more hours a day.
The main types of smart controls compatible with LED lighting include:
- Occupancy and vacancy sensors: Turn lights off automatically in rooms that are empty. Ideal for bathrooms, laundry rooms, and garages.
- Programmable dimmers: Set brightness levels by time of day. Morning routines, evening wind-down, and overnight security modes can all run without manual input.
- Smart bulbs and hubs: Brands like Philips Hue and Lutron Caséta integrate with voice assistants and smartphone apps for scene programming and remote control.
- Daylight harvesting sensors: Measure ambient light and dim artificial fixtures proportionally. These work best in rooms with large windows.
Automating lighting controls saves significant energy and increases convenience, making the upfront cost worth the investment for most homeowners. You can read more about the full range of home lighting automation advantages to see which features deliver the best return.
The most common pitfall in this stage is dimmer and driver incompatibility. Not every LED fixture works with every dimmer switch. Dimming requires compatibility between the LED bulb, the dimmer type, and the fixture's minimum load rating. A mismatch produces flicker, buzzing, or a limited dimming range.
Pro Tip: Before wiring an entire room of dimmers, bench-test a single fixture with your chosen dimmer switch. If it flickers or refuses to dim below 30%, swap the dimmer for a model listed on the fixture manufacturer's compatibility chart.
What troubleshooting tips and common mistakes should homeowners know?
Even a well-planned installation can produce surprises. Here are the issues homeowners encounter most often and how to resolve them.
Flickering lights are almost always a dimmer compatibility problem. Testing dimmer compatibility before full installation prevents this entirely. If flickering appears after installation, replace the dimmer with a model from the fixture manufacturer's approved list.
Tripped breakers after installation point to an overloaded circuit. Add up the wattage of every fixture on the circuit and confirm it stays within 80% of the breaker's rated capacity. If you are near the limit, split the load across two circuits.
Loose or unsecured wiring causes intermittent outages and is a fire risk. Pull gently on each wire nut connection after assembly to confirm it holds. Any connection that pulls apart needs to be re-stripped and re-twisted.
Poor fixture placement shows up as dark spots or uneven coverage. This is why the planning stage matters so much. If a fixture is already installed in the wrong spot, a trim ring with a wider beam angle can partially compensate without requiring you to cut a new hole.
Documenting rough-in wiring with photos and labels reduces future troubleshooting time by up to 90%. Take photos before closing up the ceiling and store them with your home maintenance records.
Pro Tip: If you encounter aluminium wiring in an older home, stop and call a licensed electrician. Aluminium wiring requires special connectors and handling that go beyond standard DIY practice.
Some homeowners in Calgary may also qualify for energy-efficiency rebates when upgrading to LED. Programmes like Mass Save energy rebates offer a useful reference point for what rebate structures look like, even if you will want to check Alberta-specific programmes through your utility provider.
Key takeaways
Successful LED lighting installation depends on thorough planning, strict safety protocols, and smart control integration to deliver lasting energy savings and improved home comfort.
| Point | Details |
|---|---|
| LED efficiency advantage | LEDs use 75 to 80% less energy than incandescent bulbs and last over 50,000 hours. |
| Plan before you cut | Map joists, ducts, and obstacles before cutting any ceiling openings to avoid costly repairs. |
| Safety first, always | Shut off the breaker and verify with a voltage tester before touching any wiring. |
| Smart controls multiply savings | Occupancy sensors and automated schedules cut lighting energy use by an additional 30 to 50%. |
| Document everything | Photograph wiring and label circuits to reduce future troubleshooting time significantly. |
What I have learned from watching homeowners upgrade their lighting
Most homeowners I speak with underestimate how much the planning stage determines the final result. They buy the fixtures, skip the ceiling map, and end up cutting holes that land on joists or miss the intended light pool by half a metre. The fix costs more in drywall repair than the fixtures themselves.
The other pattern I see consistently is the impulse to buy the cheapest LED fixtures available. Budget LEDs often use lower-quality drivers that flicker under load, produce colour shifts as they age, and fail well before the 50,000-hour mark. Spending an extra $10 to $15 per fixture on a reputable brand like Cree, Philips, or Sylvania pays back in consistent performance and warranty coverage.
Smart controls are where I see the biggest gap between what homeowners plan and what they actually install. Most people wire the lights, call it done, and never add the dimmer or sensor they originally intended. The energy savings from automation are real and measurable. Adding a single occupancy sensor to a bathroom or garage takes under an hour and pays for itself within a few months. Start with one room, see the difference on your bill, and expand from there.
The homeowners who get the best results treat this as a two-stage project: install the fixtures correctly first, then layer in controls over the following weeks. That approach avoids the overwhelm of doing everything at once and produces a lighting system that actually gets used the way it was designed.
— Starise
How Co-starise makes permanent LED lighting effortless for Calgary homeowners

Co-starise specialises in permanent outdoor LED lighting systems built specifically for Calgary's climate, using Gen 2 24V technology that handles extreme cold without performance loss. Every installation is planned around your home's architecture, with fixture placement, wiring, and smart app controls handled by Co-starise's professional team. You get the energy savings, the curb appeal, and the security benefits without spending a weekend on a ladder. If you are ready to move beyond temporary seasonal lights to a system that runs year-round on a fraction of the electricity, explore Co-starise's permanent lighting solutions and request a quote tailored to your property.
FAQ
How much energy do LED lights save compared to incandescent bulbs?
LEDs consume 75 to 80% less energy than incandescent bulbs and last over 50,000 hours. That combination of lower wattage and longer lifespan produces significant savings on both electricity and replacement costs.
What is the first step in any lighting installation?
The first step is always shutting off the circuit breaker and verifying the circuit is dead with a voltage tester. Working on a live circuit is the leading cause of serious injury during DIY electrical work.
How far apart should recessed lights be spaced?
Space recessed lights 4 to 6 feet apart and at least 2 feet from walls to achieve even coverage without scalloping or dark spots on the ceiling.
Do I need a special dimmer for LED lights?
Yes. LEDs require a dimmer that is compatible with the specific fixture's driver and minimum load rating. Using an incompatible dimmer causes flickering, buzzing, or a limited dimming range. Always check the manufacturer's compatibility list before purchasing.
Can smart lighting controls really reduce my electricity bill?
Automated schedules and occupancy sensors reduce lighting energy costs by 30 to 50% beyond the savings from LED conversion alone. The return on investment for basic smart controls is typically measured in months, not years.